This concludes our month of mega-gourmet filet action. It’s about time. Next month I’m going to try to go to the opposite side of the fence with the easiest, quickest, most ghetto food that I make for myself.
This is definitely the most fancy pants of ’em all. Beef Wellington is an old-school French preparation made by stuffing beef tenderloin (ideally with foie gras, but we’re not all jillionaires), wrapping it in Puff pastry, and baking it to perfection. It’s not as difficult to make as it seems at first, and can be greatly simplified as well by stuffing it with something simpler.
In the video I decide to stuff the Wellington with grilled asparagus and cream cheese. I made it again two weeks later with wilted spinach, Cambozola, and cream cheese and it was even better. If you want something really easy, a little creamy cheese is probably all you need – like Brie or Camembert. I leave that call up to you.
To make Wellington you will need:
1) A big hunk of beef tenderloin
2)Something to stuff it with
3) 1 Puff pastry sheet, rolled out pretty thin
4) 1 egg yolk and a splash of water (egg wash)
Then you:
1) Cut it open
2) Stuff it
3) Sear it in hot coconut oil, ghee, or beef tallow
4) Wrap it and egg wash it
5) Bake it. In this case 425 degrees F made it slightly overdone before the pastry got fully browned. 450 is probably a better temp. – granted, I’m cooking at 6,200′ in elevation which makes a difference.
If you dare to make this you won’t regret it! What a treat for a small gathering of 4-6 people!
Making beef tallow isn’t exactly a difficult or skillful process. You are basically exposing solid fat to high temperatures to extract all of the fat in liquid form from the rest of the meat and muscle fibers. Then you pour off the liquid fat and save it for cooking. Beef tallow is an excellent fat, and has pearly, ivory-like texture at cold temperatures. Good for cooking vegetables and searing meats in which you want to impart the rich flavor of beef into the food. Mmm, mmm good.
In the following video, I do not cut the beef into smaller pieces, which would’ve cut down the cooking time and yielded a larger amount of fat. Probably a bad habit. But I got 2 cups of good-quality beef tallow nonetheless.
As an interesting factoid – beef tallow was the most frequently-used household fat in the early 20th century prior to the earliest documented cases of heart disease. So much for saturated fat clogging your arteries…
As the causation of heart disease science has evolved over the past couple decades, we now know that heart disease is a disease of inflammation, oxidative damage from free radicals, and certainly not a matter of having something we eat jump into our arteries for lack of a better place to go. What increases oxidative damage and inflammation? Lots of things, but mostly polyunsaturated fat – omega 6 in particular, the type of fat we embraced while shunning the beef tallow and butter that never did us any harm. Make friends with tallow. Its incredibly low concentration of omega 6 makes it a perfect household fat along with coconut oil and dairy products.
Best temperature is probably slightly lower than the temp. I began with. 350 degrees F is probably better.
This post is more of a display than anything, as few of you own an essential piece of kitchen equipment needed to make this dish – a meat grinder. But tartare is something that is divine beyond words, and if you’ve never had it, maybe you’ll jump off the raw meat cliff the next time you see it on a menu. Making it couldn’t be simpler. Simply grind 4-6 ounces of raw beef tenderloin per person in a meat grinder, and mix it with tartare flavoring base, which is comprised of roughly:
1) 2 parts tomato paste
2) 1 part dijon mustard
3) 1 part ground horseradish
4) Plenty of salt and cayenne pepper/black pepper
5) A dash of Worcesterhire sauce
Blend these ingredients together into a paste and mix in 1 heaping spoonful with each 4-6 ounce portion that you grind. You’ll know when you get the taste just right. It’s amazing, and the meat is buttery smooth. Best served with toasted bread, crispy french fries, or something else with some good complementary starch and crunchy texture.
The Mignon Man March is going strong. Here’s the next installment – quick and easy (and smoky) blackened beef tenderloin. This one combines several prior episodes of 180 Kitchen, as I dust the tenderloin with the seasoning blend from the last post, and serve it with parmesan polenta (a former post) and wilted spinach (the first 180 Kitchen post).
Wow you guys. I’ve been putting down pound after pound of truffled fries cooked in expeller-pressed “refined” coconut oil. They are simply incredible when you get them right. Just make sure if you are dropping ’em in the oven like I do in this video, that the heat is cranked up pretty high. 425 degrees F is a minimum if you want them crispy and downright amazing. This is seriously one of the best things I’ve made and eaten in my home kitchen in the last year. Make this for yourself, your significant other, or for a small group of friends and they will have a whole new level of respect for your culinary studliness. Note: the truffle oil, although amazing, is totally not necessary. Even without it, a perfectly-cooked homemade Yukon Gold french fry that is properly seasoned is a force to be reckoned with. Enjoy!
Well folks, the time has come to post my most favorite-est thing to eat in the whole world except for, you know, foie gras, lobster, pecan-crusted sweetbreads, creamed corn, and a few other treats. And that chunk of tongue heaven is Massaman curry.
It is a Muslim-influenced curry with extra spices such as cardamom and cloves and less zesty lime juice and Kaffir lime typical of other Thai curries. In Thailand I ate it almost every day for an entire month. This is a great dish to make as a staple in your household, with an incredible and never-gets-old flavor and a fantastic ratio of saturated fat to unsaturated fat – a hallmark of 180-style dining.
Please don’t be deterred by the apparent complexity. Once you’ve made your curry paste you can make a small batch of Massaman curry from scratch in 20 minutes and pour it over a bowl of cold, day-old rice for an amazing meal. Eating healthy certainly can be less complicated than this, but for any food nerd, this is no sweat. Enjoy!
-2T each: cumin, cardamom, coriander, black pepper (pre-ground or ground fresh in a spice grinder or mortar and pestle as shown in video)
– Small pinch of whole cloves or ground cloves
– 1 pack of mild red chili pepper from the Mexican food section at the store (add warm water until a paste forms)
– 2 4-inch strips of lemongrass
– Thumb-sized piece of ginger (peeled)
– 3 whole shallots or ½ yellow onion – 2 garlic cloves
– Root end of 1 bunch of cilantro
– 1T cayenne pepper
– Splash of extra virgin olive oil
Directions
1) If using whole spices, toast in a frying pan on high heat until smoke starts to roll off of them, then grind into a powder.
2) Chop cilantro, ginger, onion/shallot, and garlic into small pieces. Really cut the lemongrass well, as large pieces often remain fibrous in the curry later on.
3) Blend all ingredients in a food processor for at least 20 seconds. Scrape sides and blend again – the more it’s blended the better. Blend for up to 5 minutes.
4) Stir in a little olive oil at the end to moisten and preserve the curry paste.
Making Massaman Curry (for 4):
1) Just like making Tom Kha Gai, begin by sautéing on medium heat (sweating) some sliced onion and sliced red bell pepper in ½ stick of butter.
2) When vegetables begin to get soft, but are not yet brown, add several tablespoons of curry paste and toast it on the bottom of the pan, stirring every few seconds. The more you add, the spicier and more powerful the finished product will be.
3) When the curry paste has cooked for a few minutes, add two cups or so of water or chicken stock, and bring to a boil. Heat on high!
4) Add ¼ cup of unflavored peanuts.
5) Next add 2-3 cans of good quality coconut milk depending on how much curry paste you added and how many people you are feeding (Chaokoh, without any emulsifiers like carageenan or guar gum is preferable). You may also add a splash of whipping cream, but that is optional.
6) Bring to a boil for 2 minutes, then add chopped raw chicken, whole shrimp, sliced beef, or diced fish. Bring to a boil once more.
7) Season heavily with salt and/or fish sauce and additional cayenne pepper if needed until the flavors come up. Do not use cilantro or a lot of lime at the end like you do with other curries! Massaman should be sweeter and less sour than both Thai soup and other curries, so go easy on the sour flavors such as vinegar and lime juice. Use, at most, the juice of ½ lime at the end.
I hated to torment you guys with this impressive display of yumminess, but the urge to do so overwhelmed any and every moral I may possess.
Unfortunately, the video I filmed last night came out sideways. Bummer. It was good (I’ll update this post if I can figure out how to fix it). No matter, the process of wrapping some cow with some pig just ain’t that difficult of a concept to understand.
First you get yourself a whole tenderloin, trimming it up by removing some of the hard, exterior fat and removing sinews. This takes practice, but isn’t rocket science. It’s not unlike whittling a stick really.
Next, you cut off the thin tail and trim up the bulky ‘head’ so that the whole tenderloin is close to uniform in size.
From there you:
1) Season tenderloin with plenty of salt and pepper, or in my case, paprika, cayenne, sea salt, and garlic powder mixed together in a “blackening spice.”
2) Lay out enough bacon strips to span the length of the tenderloin.
3) Place the tenderloin on top of the bacon strips.
4) Wrap the bacon strips snugly around the beef, not too tight or too loose, and pin each bacon strip with a toothpick or metal pin such as the kind I have in the pics.
5) Throw the whole beast on a barbecue grill, browning all the bacon on the exterior (you could bake this at very high heat if you prefer).
6) Cook very slowly on a rack above the grill or in the oven until the meat just begins to tighten.
7) Let sit, away from the heat, for 30 minutes (called “resting,” it allows the center of the meat to get nice and warm, cooking it evenly, without the exterior getting overcooked).
8 ) Reheat for 10 minutes in the oven at say, 400 degrees F.
9) Remove toothpicks.
10) Slice into nice portions and serve.
Here are the photos of this amazing concoction, served with a Yukon Gold potato and Yam gratin and Caesar salad with homemade croutons and dressing.
This one’s dedicated to my new favorite snack – brought up in 180 Kitchen, recipe #83. This time, Aurora and I have gotten crazy and added a little nutritional yeast to our coconutty favorite. Aurora, by the way, is the popcorn princess. She makes it the best. Her recipe. Not mine.
I must say, there is no finer use for coconut oil. Say what you will about butter on popcorn, but a light, expeller-pressed coconut oil shatters my best friend butter. It defies reason I know, but try it sometime, especially if you’re seeking out the metabolic advantages of coconut oil but have failed to find a way to consume it that doesn’t make you gag.
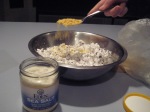
In the following recipe, I:
1) Place a jar of coconut oil into hot water to liquefy it.
2) Cook about a half cup of Steinke’s heirloom popcorn (awesome) in an air popper.
3) Pour lots of coconut oil (5-6 Tablespoons), 2T nutritional yeast (optional), and some sea salt over the popcorn and mix it all up a bit.
That’s about all there is to it. Does anyone really not have time to do this at home? Makes a great post-dinner snack. Get’s that ol’ tryptophan across the blood-brain barrier where happy serotonin gets made and transformed into melatonin for a long, dreamy night’s rest.
The calorie slayer is live on wordpress, ready to throw down all things edible.
For starters, I’ll be posting tidbits here and there about my own personal diet. From time to time we’ll get into some recipes and techniques, complete with instructional photos. I’ll give you some choice links to some of my favorite things at what is hands down the best cooking website on earth at the moment – www. rouxbe.com By 2010, I’m going to do some filming as well, getting into some excellent and 100% free cooking instruction to help you spank food’s ass like a pro.
Welcome to the 180 Kitchen! Get ready to splatter some grease!
For a primer to the site, please read my February, 2009 eBook release: 180 Kitchen: 180 Tips, Recipes, and More. Available HERE.